Partial Tile Collision in Phaser 3: Climbing "Slopes"
- cedarcantab
- May 14, 2022
- 5 min read
Updated: May 17, 2022
Having worked out the basic logic for detecting collisions with partial tiles, there is light at the end of the tunnel to making Mario climb up the "sloped" scaffolding!
Creating the playground
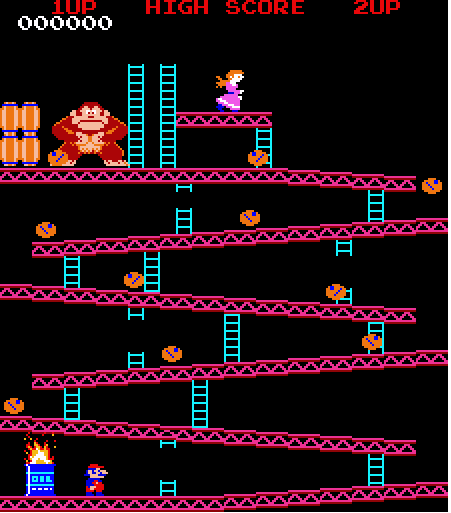
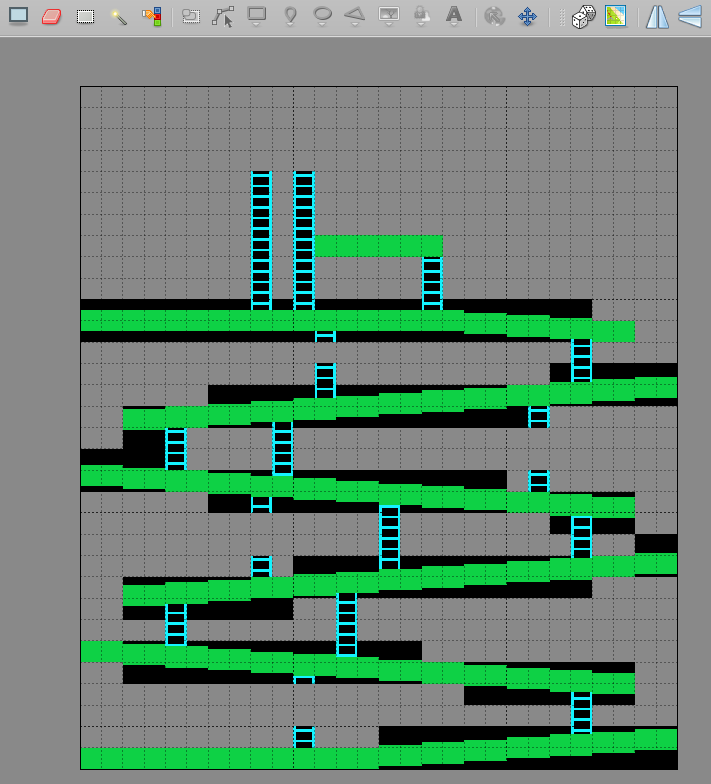
Using the tileset of the previous post, we can create the "scaffolding" structure of the Donkey Kong Ramp stage, like so.
This will be used to develop the climbing code.
Logic for climbing
I did in fact create a demo of Mario climbing up the Ramp Stage and barrels rolling down the girders, to demonstrate what can be done with manipulating pixel-level data of the HTML canvas. I wrote it about it in this post here (embarrassingly, there's some information in there that is not entirely accurate!). In that code, I checked the pixels at the bottom left and bottom right of Mario, and determined whether to make Mario move up or down. We can use a similar logic.
check whether the forward foot is colliding against a tile.
if the top of that tile is higher, it means Mario should climb up
If there is nothing there, Mario keeps going, unless he is floating in air, in which case we let gravity do the work
Ironically, in the code using bitmaps, it was just a matter of checking the color of the pixel at the desired point.
In our tilemap example, we need to write a customised version of getTileAtWorldXY that works on partial tiles.
getTileAtWorldXY for partial tiles
In comparison to the custom version of getTilesWithinWorldXY, this is relatively straight forward. You first get the tile at the WorldXY position using the "original" Phaser 3 getTileAtWorldXY method, then check if the point intersects with the "filled in" part of the obtained tile.
In the case of getTileWithinWorldXY, I used the Phaser's Geom.Intersect method, and I could have done something similar in this case. However, so I know exactly what's happening, I wrote my own.
  getTileAtWorldXY(x,y) {
    let cozyTile = new CozyTile();
    let pTile = this.colliderLayer.getTileAtWorldXY(x,y);

    return (pTile === null || !this.intersectPoint(pTile, x,y)) ? null : cozyTile.copy(pTile);
  }

  intersectPoint(tile, x,y) {

    var tileLeft = tile.pixelX;
    var tileTop = tile.pixelY + tile.properties.top;
    var tileRight = tile.right;
    var tileBottom = tile.bottom - tile.properties.bottom;
    // check whether the point being checked actually intersect
    return (x>= tileLeft && x<= tileRight && y>=tileTop && y<=tileBottom);

  }
Making Mario Climb
We use the above method to detect the tile at Mario's feet when moving horizontally, as follows.
We calculate how much higher the colliding tile is (in this particular case, it would always be 1 pixel, since the play screen is designed that way). We check if the "ascent" is within the this.climbableHeight property (set to 1 in the constructor function of the CozyBody class), and if so call this.climbUp method.
  processX(body) {
    // check world boundary collision against the vertical walls

   //   REDUCTED

    // Climb slope logic
    const hitBoxSide = (body.delta.x > 0) ? body.newPosition.x + body.width-1 : body.newPosition.x;
    // First check one pixel at bottom of feet to see if we need to climb
    const feet = this.getTileAtWorldXY(hitBoxSide, body.bottom);
    // if the pixel at feet is blocked and the player is currently on the ground see if it is of climable height
    if (feet !== null && body.onFloor)
    {
      let hill = (body.bottom+1) - (feet.pixelY);
      if (hill <= body.climbableHeight) this.climbUp(body, hill);
    }

// Standard tile collision detection, separation & response code follows
// REDUCTED
  }
ClimbUp method
The climb up method simply moves the various position properties of the physics body by the amount of ascent, before the succeeding collision detection stuff takes place.
 climbUp(body, ascent) {
    body.newPosition.y -= ascent; // adjust the y-coordinate upward
    body.top -= ascent;
    body.bottom -= ascent;
    body.delta.y -= ascent; // increment the delta as well
  }
And that's the basics of my "slope" climbing logic. Just to make the player character a bit closer to the original game, I have set the checkCollision properties of all directions except for down, to false by including the following in the create of main game scene.
   this.player = new Player(this, 50, 30);
   this.world.add(this.player);
   this.player.body.checkCollision.up = false;
   this.player.body.checkCollision.left = false;
   this.player.body.checkCollision.right = false;
This allows the player to jump and overlap the girders above without being forced down. You have to be careful with the gravity setting and the magnitude of the jump, otherwise you could end up jumping through the girder above and land on it.
Below is the bare bones demo code.
Risk of Tunnelling
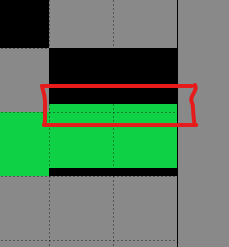
I was worried about the risk of tunnelling. This risk is reduced by not having "thin" tiles on their own in any part of the playscreen. However, thin tiles do exist, like below. The code seems to handle such areas without causing any noticeable errors, probably because:
the player object is inherently moving slowly, or
if by chance the player does slip through the upper tile, he is probably caught in the lower tile, and the algorithm will dig the player out in the next refresh
CozyPhysics engine in action!
And finally, we can overlay the actual Donkey Kong tileset on top of the tilemap created above, add the relevant images, and voila! We have Mario climbing up the girders and rolling barrels!
By default, CozyPhysics engine sets the size of the CozyBody to the same size as the parent sprite. In this demo code, I have shrunk Mario's CozyBody to 8x8 and offset the origin so that the bottom of the physics body is lined up with Mario's feet.
this.mario.body.setSize(8,8).setOffset(6,8);10 barrels are created by a timer at 2 second intervals, with a horizontal velocity. Their bounce property is set to (1, 0.1) so horizontally they keep their velocity but vertically they bounce just a little bit. The barrels are programmed to return to their starting position at the top of the screen, when they reach the oil drum at the bottom left hand corner.
And here is the Mario demo!
Lots more to do but no more energy to code!
When I started out on this journey, I fully expected to create a demo that showed Mario walking and jumping on the scaffolding and climbing. Unfortunately, creating the physics engine was far more challenging and time consuming than I anticipated, and I have simply ran out of energy to work on this demo any further. Perhaps some brave souls out there will take my findings and develop it a bit more, like in the following areas!
Mario bumps his head!
Although I have shrunk Mario's physics body to 8x8, he will still bump his head against low girders. My CozyPhysics engine does take into consideration collisionCheck property of the body, as well as the collision flags of the tiles. You can play around with such properties to allow Mario to jump "through" the girders above.
I have not built the ability to climb!
I have built code for making characters climb ladders in tilemaps (documented here ). To make the code work with partial tile maps, the easiest way is to set properties to identify for each tile, where the ladder start and end, similar to what I have done for the scaffolding.


Comments