Danmaku using Phaser 3 (lesson 31): DRAW revisited (again)
- cedarcantab
- Oct 30, 2021
- 7 min read
Updated: Nov 3, 2021
The morning after posting part 3 of lesson 30, I had the urge to add some functionality to the DRAW danmaku. With the existing version of the code, the "picture" would emerge from a single point, expanding to form the picture, continue to expand until disappearing off the screen. I could combine it with Stop & Go bullets with bearingLock to "shoot" the pictures in the direction of the target (player). However, I wanted a simpler way of shooting the pictures in a predetermined direction. Then I wanted to add functionality to have the picture "implode"...and so it went. After fiddling with the code, the new functionalities that I have added are as follows:
the picture "snap" into existence, as opposed to expanding from the centre of the danmaku
the picture can still emerge/expand from the centre of the danmaku
the picture can "implode" after snapping into existence
all of the pictures can now be rotated, and have their aspect ratios changed (the previous version of the code could not cope with rotating pictures like the Club).
you can draw multiple pictures at the same time.
you can specify whether the picture is a "closed" picture or an "open" picture so that when the cannons are created along the curve making up the picture, the last one does not overlap the first one for closed pictures.
The respective functions to "draw" the picture simplified
The first thing I did was to simplify the functions that create the original Phaser Curves.Path object such that the object (createStar, createHeart etc) created is the object at the nominal size (principally 100x100) centered around (0,0). All the rotating, expanding/shrinking and shifting to the centre are now handled by the cannonsFromCurve function. For example, the createStar function looks like below with all the rotation and other stuff now removed.
function createStar() {

  const nominalSize = 100;
  const radius =  nominalSize/2
  const vertices = [];
  vertices.push(new Phaser.Math.Vector2().setToPolar(-Math.PI / 2, radius));
  vertices.push(new Phaser.Math.Vector2().setToPolar(Math.PI / 3, radius)) ;
  vertices.push(new Phaser.Math.Vector2().setToPolar(-5/6 * Math.PI, radius));
  vertices.push(new Phaser.Math.Vector2().setToPolar(-Math.PI / 6, radius));
  vertices.push(new Phaser.Math.Vector2().setToPolar(2 / 3 * Math.PI, radius));

  var star = new Phaser.Curves.Path(vertices[0].x,vertices[0].y)
  for (let i = 1; i< vertices.length; i++) {
    star.lineTo(vertices[i].x, vertices[i].y)
  }
  star.closePath()
  return star;
}
I also took the opportunity to rewrite the createPolygon function so that a Curves.Path object is created as opposed to a Geom.Polygon object - that way, the createCannons function can be factored.
function createPolygon(vertices) {
  const nominalSize =100;
  const radius = nominalSize/2;
  const angleDelta = Math.PI *2 / vertices
  const rPolygon = new Phaser.Curves.Path(0, radius);
  for (let i = 1; i < vertices; i++) {
    rPolygon.lineTo(new Phaser.Math.Vector2().setToPolar(Math.PI / 2 + angleDelta * i, radius))
  }
  rPolygon.closePath();
  return rPolygon
}
I have also changed the PARALLEL danmaku to utilise Curves.Line, so that the cannons creation can also be shared with the other pictures. This, in hindsight was probably not such a great idea, as trying to handle an object with "zero" height has made the cannonsFromCurve function unnecessarily complex. Not only that, I have ended up getting rid of the random function. I will probably amend this at some future date.
Creating new variables, again
In order to handle the more complex functionalities, I have had to create some new variables, the key ones being:
width, height: used to specify how big the picture should be (or specify the width vs height). If not specified, will be 100.
swtich: used to indicate whether the picture should expand from a point (if set to 1), or if set to -1, shrink, or if 0, the picture snap into existence and fly in the direction that the danmaku is facing.
flag: if set to true, it means the curve.path is closed. if set to false, it means curve.path is an open shape. For regular polygon, circle, etc this should be set to false, to get the right number of cannons (bullets) on the curve (otherwise the last cannon will overlap with the first one).
multiple: to indicate how many of the same pictures should be drawn at once
xOffset, yOffset: indicate how "far" the picture should appear away from the danmaku
ratio: used to indicate the "aspect ratio" when drawing ellipses (a new function)
These have been set up as properties of danmakuConfig;
    this.danmakuClass = danmakuConfig.class;
    this.danmakuType = danmakuConfig.type;
    this.danmakuCount = danmakuConfig.count || 1;
    this.danmakuWidth = danmakuConfig.width;
    this.danmakuHeight = danmakuConfig.height;
    this.danmakuXOffset = danmakuConfig.xOffset || 0;
    this.danmakuYOffset = danmakuConfig.yOffset || 0;
    this.danmakuMultiple = danmakuConfig.multiple || 1;
    this.danmakuSize = danmakuConfig.size;
    this.danmakuRatio = danmakuConfig.ratio || 1;
    this.danmakuSwitch = danmakuConfig.switch;
    this.danmakuFlag = danmakuConfig.flag;
Although not directly relevant to this post, I will change the varialble used to determine the breadth of the cannons in the "PARALLEL" danmaku to width, since that is more intuitively obvious.
Revised cannonsFromCurve function
The revised cannonsFromCurve function now handles all the new optionalities. Basically, this function takes the Curves.Path object, lerps through the curve x numberOfCannons number of times to create points, and then gets the angle and distance of the points from the centre to create the bullet bearing and bullet speed respectively.
The function handles the aspect ratio by using vector multiplication, rotates the point around the centre by using Phaser's built in rotate method, and then finally shifts the point to the centre simply by adding the danmakuPosition vector (since the original Curves.Path object is centered around 0,0).
function cannonsFromCurve({
  curve,
  width=100,
  height=100,
  heading,
  offset=0, // this is optional distance to "shift" the shape from the centre of danmaku
  centre, // this is the origin of the danmaku
  numberOfPoints,
  speed,
  anglesArray,
  speedArray,
  cannonPositions,
  emerge=0,
  open=true,
  multiple=1
})

{   // start of main code

  const speedMultiple = speed / 50;
  const speeds = [];
  const pointsArray = [];
  const startAsPoint = width === 0 && height === 0;
  const aspectRatio = new Phaser.Math.Vector2(width / 100, height / 100);

  if (startAsPoint) {
    aspectRatio.set(1, 1);
  }
  let angle = heading + Math.PI / 2;
  const angleDivision = (Math.PI * 2) / multiple;
  for (let j = 0; j < multiple; j++) {
    const shapeAngle = angle + angleDivision*j;
    const cOffset = new Phaser.Math.Vector2(0, (curve.type === "LineCurve") *50-offset).rotate(shapeAngle);
    for (let i = 0; i < numberOfPoints; i++) {
      const realPoint = curve.getPoint(i / (numberOfPoints - 1 * open)).multiply(aspectRatio).rotate(shapeAngle).add(centre);
      anglesArray.push(emerge === 0 ? heading + angleDivision * j: Phaser.Math.Angle.BetweenPoints(centre, realPoint) -(emerge === -1) * Math.PI);
      speeds.push(emerge === 0 ? speed : Phaser.Math.Distance.BetweenPoints(centre, realPoint) * speedMultiple);
      pointsArray.push(realPoint.add(cOffset));
    }
  }
  speedArray.push(speeds);
  if (!startAsPoint) {
    cannonPositions.push(...pointsArray);
  }
} // end of create cannons from curve function
The blue highlighted line handles the shifting of objects away from the danmaku centre. It is more complex than necessary because of the need to handle Lines, which is created 50 pixels away from the 0,0 in the first place (so that speeds - which are based on the distance of the points on the curves object away from the centre - don't end up being zero) whereas all the other objects are centered around 0,0.
Drawing the "pre-formed" picture
In order to have the picture appear "formed" as opposed to expand from a single point, we must be able to "place" the bullets in pre-determined positions, away from the centre of the danmaku. We can utilize the code we developed for the "PARALLEL" danmaku, which creates a array called this.cannonPositions which holds the positions from where the bullets should be fired from. If this array is empty, then the existing code simply fires all bullets from this.danmakuPosition (ie the cenre of the danmkau opbject).
New createArc function to draw circles, ellipses or arcs
I have created a new function which creates Phaser's Curves.Ellipse object. This function takes to parameters: aspect ratio, and angleRange.
function createArc(aspectRatio, angleRange) {

  const startAngle = (angleRange === undefined) ? 0 : -90 - angleRange/2;
  const endAngle = (angleRange === undefined) ? 360 : -90 + angleRange/2;
  const nominalSize = 100;
  const radius = nominalSize / 2;
  const ellipse = new Phaser.Curves.Ellipse(0, 0, radius, radius * aspectRatio, startAngle, endAngle);
  return ellipse;
}
Aspect ratio is set as a single parameter, which represents the ratio of the y-radius vs the x-radius. The function assumes the x-radius to be 100.
The angle range is the range across which an arc is drawn, centered around the danmaku angle.
If aspect ratio is 1, and the angle range is 360, a circle will be drawn.
Interestingly, by drawing a circle, and having the danmaku rotate, the effect is the same as a NWAY. Also if you have multiple arcs, and rotate the danmaku, the effect is the same as multiple-Nway.
LifeSpan and offscreen
Although not directly relevant to the revised "DRAW" functions, I have created a new parameter called bulletType.offscreen, which if set to true, will keep the bullet alive even if it goes off screen. The default being false. This is so that for "DRAW" type of patterns, you might want to keep the bullets alive even if it "temporarily" goes off screen, particularly with curving bullets. As before, it is important to set a lifeSpan with curving bullets otherwise you could have bullets wondering around the screen forever.
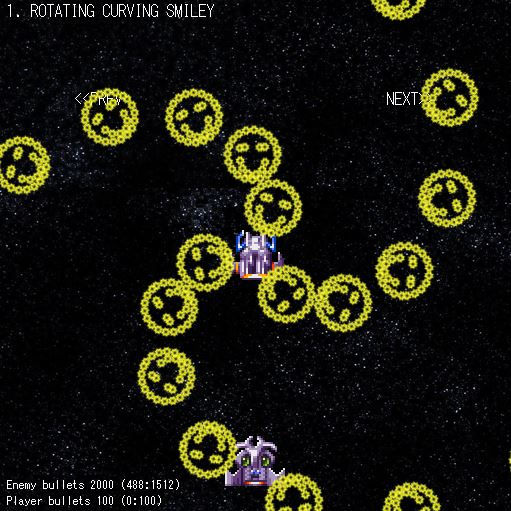
Creating multiple shooting Smileys
The danmaku pictured at the beginning of this post was created with parameters below. It tells the danmaku to draw 3 smileys of size 50x50. As the switch is set to 0, the smileys are immediately drawn 50x50, each with 30 bullets.
danmakuPattern.push({
name: "ROTATING CURVING SMILEY",
danmakuConfig: {
class: "DRAW", type: "SMILEY",
width: 50, height: 50,
yOffset: 0,
count:30,
angle:90, angularVelocity: 90,
switch: 0,
multiple: 3
},
numberOfShots: -1,
bulletType: {
class: "NORMAL" ,
speed: 200, fireRate: 250,
texture: "cross", frame: 3
},
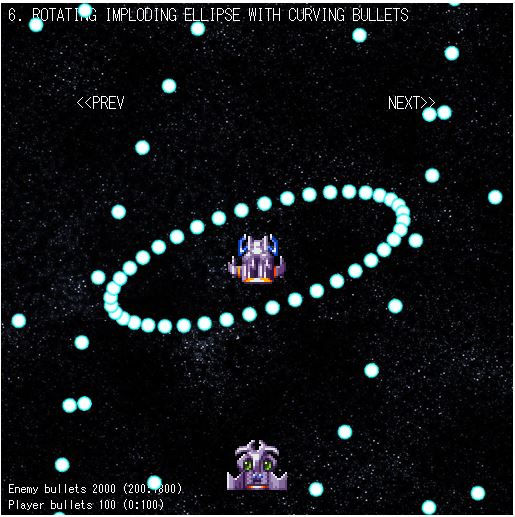
});Rotating Imploding Ellipse with Curving Bullets
When you start combining the Draw danmaku with curving bullets, you can get some very interesting effects. For example the below set of parameters draws an ellipse of x-radius 300 y-radius 100, which then "implodes" (switch set to -1) and the bullets are given a bearing velocity of -20 degrees; hence the ellipse "rotates" anti-clockwise as it shrinks then expands again (when the bullets fly past the centre). The results are quite difficult to predict but it is well worth experimenting with the parameters.
danmakuPattern.push({
    name: "ROTATING IMPLODING ELLIPSE WITH CURVING BULLETS",
    danmakuConfig: {
      class: "DRAW", type: "ARC",
      count: 40,
      width: 300, height: 100,
      angle: 90,
      angularVelocity: 20,
      switch: -1,
      flag: false
    },
    numberOfShots: -1,
    bulletType: {
      class: "NORMAL" ,
      speed: 50, fireRate: 2000,
      bearingVelocity: -20,
      texture: "roundMID", frame: 5,
      offScreen: true,
      lifeSpan: 10000,
    },
  });
Notes for future development to myself
I have achieved most of what I sought to achieve. However, I now realise that there are things that probably should be re-written for more flexibility and easy of code readability.
Nominal size of curve object: there is no real need to create the original Curves.Path object with nominal size of (approximately) 100x100. In fact it makes the code more complex than necessary.
Parallel danmaku: by using the Curves.Line object, I have now factored the cannons creation routine with the other draw objects. However, Line, being a "1D" object as opposed to a 2D object has made the code more complex than necessary.
Cannot Expand from a snapped picture: at the moment, when switch is set to 1, the code assumes that the bullets must start from the centre of the danmaku; ie the picture emerges from a point and expands outwards. The code cannot have a picture pre-formed, then expand from there.
As always, the CodePen is available here, for your perusal and comment.


Comments