Danmaku using Phaser 3 (lesson 27 part 1): Stop & Go Bullets
- cedarcantab
- Oct 17, 2021
- 4 min read
Updated: Nov 26, 2021
It is time to put some more "intelligence" into the bullets themselves. In this post, we create "stop & go" bullets.
Changing way the transform object is accepted by the bullet
But before I dive into the code for bullets that move for a prescribed time, stop for a prescribed time before moving again, I have once again changed the way to pass parameters to the danmaku and subsequently to the bullet class, and changed the name of some of the parameters. Specifically, the key change I have made is to assign the bulletTransform parameter properties, to primitives, as soon as they are received by the danmaku class. In otherwords, in the previous version of the code, in the bullet class, the parameter was set to the bullet object specific property as follows:
this.bulletTransform = bulletTransform;Now it is like this. More checks are performed when the parameter is first received by the bullet object, before being passed off to the main bullet fire method.
// set up variables relating to bulletTransform option
    this.bulletTransformType = bulletTransform.type;
    this.bulletStage1Time = bulletTransform.stage1Time;
    this.bulletStage2Time = bulletTransform.stage2Time;
    this.newBulletType = bulletTransform.type || this.bulletType;
    this.newBulletSpeed = bulletTransform.speed || this.bulletSpeed;
    this.newBulletAcceleration = bulletTransform.acceleration || this.bulletAcceleration;
    this.newBulletBearingVelocity = Phaser.Math.DegToRad(bulletTransform.bearingVelocity) || 0;
    if (bulletTransform.bearingLock) {
      this.newBulletBearing = this.cannonAngle;
    }  else {
      this.newBulletBearing = Phaser.Math.DegToRad(bulletTransform.bearing) || this.bulletBearing;
    }
    this.newBulletAngularVelocity = bulletTransform.angularVelocity || 0;
    this.newBulletCycleLength = bulletTransform.cycleLength;
    this.newBulletAngleRange = bulletTransform.angleRange;
    this.newBulletTexture = bulletTransform.texture || this.bulletTexture
    this.newBulletFrame = bulletTransform.frame === null ? this.bulletFrame : bulletTransform.frame;
    this.newBulletCount = bulletTransform.count || 1; // (used to be splitInto)
    this.newBulletSeek = bulletTransform.seek || false; // if set to true, the direction of the bullet will be reset to the direction of the target, when the bullet starts moving.
    this.newBulletTarget = bulletTransform.target || null;
    this.newBulletType = bulletTransform.bulletType || this.bulletType;
    this.newBulletBounceX = bulletTransform.bounceX || 0;
    this.newBulletBounceY = bulletTransform.bounceY || 0;
    this.newBulletLife = bulletTransform.lifeSpan || -1;
It is a simple change but one that I believe will make the maintenance of the code a bit easier as we build on more functionalities. Also, I sometimes find the behaviour of objects unpredictable when being passed around from function to function.
I have also create a new variable to check whether the bullet has "transformed"
this.transformed = false;
As an aside, I have also changed the lifespan of bullets into a property of bulletType object variable, rather than bulletTransform object.
Cleaning up the properties of bullet parameter object
In lesson 26, we converted the bulletType parameter into an object; however, I didn't get much further than that. In this post, I have now re-assigned the bullet related variables to properties of the bulletType parameter object. As with the bulletTransform parameter object, the various properties are assigned to primitives, as soon as they are received by the danmaku object.
// read all the bullet specific parameters
    this.bulletTypeClass = bulletType.class || "NORMAL";
    this.bulletBearingVelocity = Phaser.Math.DegToRad(bulletType.bearingVelocity) || 0;
    this.bulletAngle = this.cannonAngle; // angle of bullet image is same as cannon direction
    this.bulletAngularVelocity = bulletType.angularVelocity || 0;
    this.bulletSpeed = bulletType.speed || 0;
    this.bulletMaxSpeed = bulletType.maxSpeed || -1;
    this.timeBetweenShots = bulletType.fireRate || 0;
    this.bulletAcceleration = bulletType.acceleration || 0;
    this.bulletCycleLength = bulletType.cycleLength;
    this.bulletBounceX = bulletType.bounceX || 0;
    this.bulletBounceY = bulletType.bounceY || 0;
    this.bulletTexture = bulletType.texture;
    this.bulletFrame = bulletType.frame;
    this.bulletLife = bulletType.lifeSpan || -1;
    this.bulletTarget = bulletType.target || null;
I have also added a parameter to set the maximum speed of a bullet.
Amending the edge detection routines
And before we get to the stop & go bullet code, some more changes...I have amended the screen edge detection code that has been bothering me. I have changed it to take into account the size of the sprite, as opposed to simply checking whether the centre of the sprite has hit the edge or not. I have created two functions to detect whether the bullet has flown off the left or right, and top and bottom.
outOfScreenY(bullet) {
    return (
       bullet.y + bullet.displayHeight/2 <= 0 || bullet.y >= HEIGHT + bullet.displayHeight/2
    );
  } // function to detect when bullet out of screen area

  outOfScreenX(bullet) {
    return (
       bullet.x + bullet.displayWidth / 2 <= 0 || bullet.x >= WIDTH + bullet.displayWidth/2
    );
  } // function to detect when bullet out of screen area
Then the code to switch off the bullet when off screen becomes much simpler and readable, as follows.
if (this.outOfScreenX(this) || this.outOfScreenY(this)) {
      this.switchOff();
    }
And while I'm at it, I have created similar functions to detect whether the bullets have hit the edge of the screen.
hitEdgeY(bullet) {
    return (
       bullet.y  <= bullet.displayHeight / 2 || bullet.y >= HEIGHT - bullet.displayHeight/2
    );
  } // function to detect when bullet hits edge of screen


  hitEdgeX(bullet) {
    return (
       bullet.x <= bullet.displayWidth / 2 || bullet.x >= WIDTH - bullet.displayWidth/2
    );
  } // function to detect when bullet hits edge of screen
The reason for writing these functions is to give bullets the ability to "bounce".
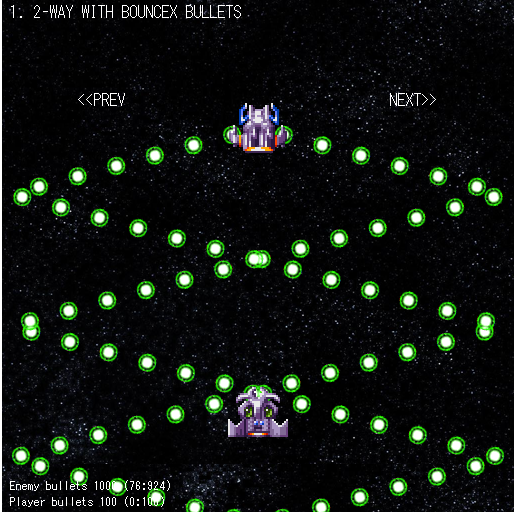
Giving bullets the ability to BOUNCE
We create new bulletType properties called bounceX and bounceY which should be to something between and 1. This variable will be applied to the velocity when bounce. If 1, the bullet will bounce off the edge of the screen at the same speed it hit the edge.
Whilst you cannot see the bullets bouncing (obviously) in a still picture, the below parameters create a right rotating 2x3-way danmaku which shoots bullets that bounce of the top and bottom, but disappears off the sides.
The bouncing feature does not work in conjunction with curving bullets, since the curving is currently achieved by tweens which have their bullet angle tweening, "hard-coded" when the bullets are first fired, and cannot be changed - that is something for a later project.
 danmakuPattern.push({
    name: "2 x 3-WAY RIGHT CURVING BULLET",
    danmakuType: { class: "MULTI_NWAY", count: 3, angleRange: 180 },
    numberOfCannons: 2,
    cannonAngle: 90,
    cannonAngleRange: { start: 25 },
    cannonAngularVelocity: 30,
    numberOfShots: 5,
    stopShotsTime: 1000,
    bulletType: {
      class: "NORMAL",
      speed: 80, fireRate: 1000,
      bounceY: 1, // bounce option currently does not work in conjunction with curving bullets
//      bounceX: 1,
      texture: "eyeball", frame: 1,
//      bearingVelocity: 15,
      lifeSpan: 10000
    },
  });
And although we have not even started on the stop & go bullet code, that's it for this post, as it has become too long! I get to start on the stop & go in the next post.


Comments