Danmaku using Phaser 3 (lesson 26): Regular Polygons
- cedarcantab
- Oct 16, 2021
- 4 min read
In lesson 21 we created a danmaku where we could specify the pattern of bullets to be "painted" by created an array of strings to specify that pattern.
In this post we try to create a danmaku whereby we can generate bullets that form regular polygons, by specifying the number of vertices.
In principle, we need to calculate the "points" that make up the polygon we want to "draw". If we were to do this from scratch, this would involve a lot of code. However, Phaser provides a lot of functions to make life easy for us.
The basic steps are:
Assess the position of the vertices of the regular polygon
Calculate the edges that make regular polygon
Calculate the position of "bullets" or points along the edges of the polygon
We calculate the "angle" of each of those points from the centre. That will form the direction in which the bullets will be fired
We can take the distance from the "centre" of the polygon as a reference for bullet speed
To effect steps 1 and 2, we will utilise the Phaser.Geom.Polygon method.
function createPolygon(heading, numberOfVertices, offset) {
  const nominalSize = 100;
  const vertices = [];

  // set the first vertex and push it into vertices array
  vertices.push(
    new Phaser.Math.Vector2().setToPolar(heading, nominalSize).add(offset)
  );
  // create the other vertices and push them into vertices array
  for (var i = 1; i < numberOfVertices; i++) {
    vertices.push(new Phaser.Math.Vector2().setToPolar(heading + i * ((2 * Math.PI) / numberOfVertices),nominalSize).add(offset));
  }
  const polygon = new Phaser.Geom.Polygon(vertices);

  return polygon;
}
The line in bold calculates the required number of vertices using polar coordinates, and stores them in an array as Phaser 2D vectors. Although it may be a little confusing to store "positions" as vectors, I believe this makes the rest of the code easier. Note, to take care of the fact that the polygon needs to be created relative to the centre of the danmaku, we pass a varialble called offset, which is Phaser vector that we have created in this version of the code.
Once the vertices have been stored in the array, then the Phaser Polygon method is called (line in red) to created a Phaser polygon object, and this is returned as a result from the function.
The other critical function we have created is polygonCannons, which achieves steps 4 and 5 above.
function polygonCannons(polygon,centre,numberOfPoints,speed,anglesArray,distancesArray) {

  const scaleFactor = speed / 100;
  const points = polygon.getPoints(numberOfPoints);

  //calculate the angles and distances of each point from the origin and store into specified arrays
  for (var i = 0; i < numberOfPoints; i++) {
    anglesArray.push(Phaser.Math.Angle.BetweenPoints(centre, points[i]));
    distancesArray.push(Math.round(Phaser.Math.Distance.BetweenPoints(centre, points[i])) *scaleFactor);
  }
}
The angles and distances (or bullet speeds) are stored in the arrays passed as parameter of the function (in bold above), rather than the usual way of manipulating global variables or assigning the returned result to a variable (since we want two arrays to be set up). As far as I can tell, Javascript passes variables to functions as values, so in principle you can not get functions to change the value of the variable passed as a parameter. However, you can essentially achieve the same effect as "passing parameters by reference" with objects and arrays. Although very flexible, I do find this quite confusing and unpredictable at times, so am usually reluctant to use it. However, in this particular case, this results in compact code.
Telling the danmaku object to create Polygon
We will use the danmakuType parameter to tell the danmaku object to create polygons. We need to pass the number of vertices as well as the "density" of the points to draw the polygon. We could simply create 2 new variables to hold such information. However, as the list of parameters is getting very long, and quite frankly confusing even for myself, I will turn the danmakuType variable into a object, and pass multiple data, including vertices as a property of the class (the "density" of points along the edge of the polygon, we can use the number of cannons); like below (danmakuType.class representing the actual type of the danmaku).
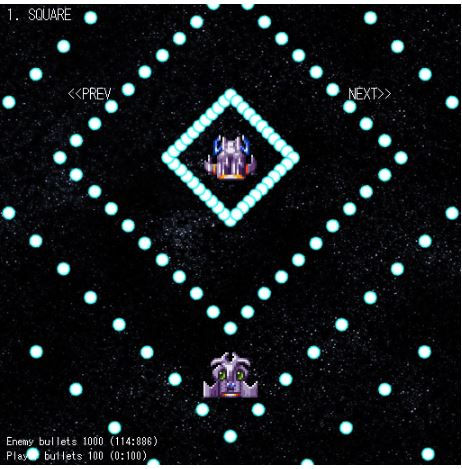
danmakuPattern.push({
    name: "SQUARE",
    danmakuType: { class: "POLYGON", number: 4 },
    numberOfCannons: 40,
    cannonAngle: 90,
    numberOfShots: -1,
    bulletSpeed: 80,
    timeBetweenShots: 1500, // time between bullets in ms
    bulletTexture: "roundMID",
    bulletFrame: 5
  });
In a similar fashion, I have "moved" the Multi-Nway" specific parameters properties of the danmakuType object.
numberOfNWAY = danmakuType.number
NWAYAngleRange = danmakuType.angleRange
Similarly for PAINT danmakyType, picture parameter is now danmakuType.picture.
Having turned them into objects so that they are easier for the human being to understand, once the variables are accepted into the danmaku object code, they are in principle, assigned to primitive variables, as I am always wary of unintentionally changing the original variable content by manicuring properties of objects. That is the reason for code such as below (within the setProperties function)
this.danmakuTypeClass = danmakuType.class;
    this.danmakuTypeNumber = danmakuType.number;
    this.danmakuTypeAngleRange = Phaser.Math.DegToRad(danmakuType.angleRange) || Math.PI * 2;
    this.danmakuTypePicture = danmakuType.picture;
At the same time I have turn the bulletType paramter into an object also. The bulletWaveCycle variable associated with the "WAVING" bulletType has been converted into bulletType.cycleLength. It probably makes sense to convert the other bullet specific primitive varialbles like speed, texture and frame but I will get around to that some other day.
But I digress. When the danmaku object identifies a "POLYGON" danmakuType, it executes the following.
case "POLYGON":
        const shape = createPolygon(this.cannonAngle,this.danmakuTypeNumber,this.danmakuPosition);

        polygonCannons(
          shape, // this is the polygon object on which danmaku pattern will be based
          this.danmakuPosition, // this is the "centre" of polygon from which the cannonshot speeds will be calibrated
          this.numberOfCannons, // number of bullets to create polygon
          this.bulletSpeed,
          this.cannonAngles, // this is the array to hold the cannon angles - pass by reference
          speedsArray // this is the array to hold the cannon shoot speeds - pass by reference
        );
        this.cannonShotSpeeds.push(speedsArray);
        break;
After that, we cycle through the cannonAngles and cannonShotSpeeds array to shoot the bullets as required.
Parameters for examples
The danmaku pictured at the beginning of this post was created with the following parameters.
danmakuPattern.push({
    name: "SQUARE",
    danmakuType: { class: "POLYGON", number: 4 },
    numberOfCannons: 40,
    cannonAngle: 90,
    numberOfShots: -1,
    bulletSpeed: 80,
    timeBetweenShots: 1500, // time between bullets in ms
    bulletTexture: "roundMID",
    bulletFrame: 5
  });
The above is a square, with 40 "points" drawing the square.
You can combine this danmaku class with cannon rotation, or bullet rotation, etc.
Here is the CodePen for your perusal and comment.


Comments