Danmaku using Phaser 3 (lesson 38 Part 2): PAINT re-revisited
- cedarcantab
- Nov 14, 2021
- 4 min read
Updated: Nov 23, 2021
In this post, I continue my re-write of the PAINT danmaku which has been changed for the following:
the picture data, rather than being defined in the main code, it now defined in a separate JSON file, and loaded.
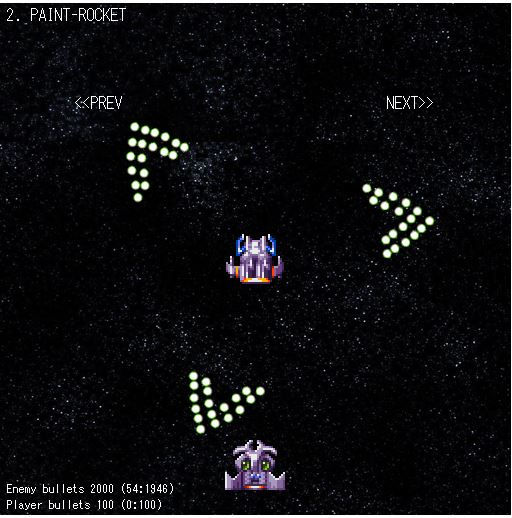
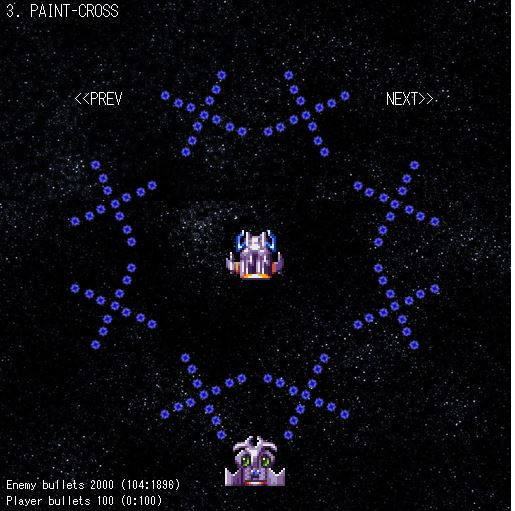
the pictures can be "fired" from multi-nway, and even PARALLEL and BI_DIRECTIONAL danmaku (which following the revision in the previous post, are sub-types of the nway danmaku, as opposed to a separate danmaku class), whereas before, it could only be fired from a standard nway
SetUpCannons function
In the previous post, I got as far as explaining that I had re-written the renamed the getArcsAngle function to getCannonSpokes and had expanded its role. In parallel with this change, the setUpCannons role has become smaller, as the setting up of PARALLEL cannons at the end of each spoke, or setting up the "pair" for BI_DIRECTIONAL is all done by the setCannonSpokes function.
I have left the offseting of the cannon origins by "centre" (ie the danmaku position) to this function rather than the setCannonSpokes, as this makes it easier to implement the PICTURE danmaku as a shotType (as opposed to danmakuClass).
The biggest change is that PAINT is now a shotType, and the setting up of cannons related arrays for PAINT pictures is handled by the revised setUpCannons function, which accordingly takes in a lot more parameters. Most importantly, I have created the following new parameters;
cannonConfig.pAngleRange = cannonPAngleRange ---> specifically for determinig the "projected angle" of the painted picture, as cannonAngleRange is used to define the angle range of each nway,
width === cannonConfig.width; used to be danmakuWidth <<- this is now used by the PARALLEL danmakuType.
function setUpCannons({
  shotType,
  spokesArray,
  originsArray,
  centre,
  shotsCount,
  spreadCount,
  bulletSpeed,
  counter,
  shotAcceleration,
  picture,
  pAngleRange,
  pWidth = 100, // width for KeepShape pictures
  keepShape = false,
  anglesArray,
  pointsArray,
  speedArray
})
{
  switch (shotType) {
    case "PAINT":
      break;
    default:
      anglesArray.push(...spokesArray);
      pointsArray.push(...originsArray.reduce((acc,p)=>[...acc, p.add(centre)],[]))
  }

  switch (shotType) {
    case "PAINT":
      const speeds = [];
      const textLine = picture[counter]
      const count = textLine.length;
      const line = createLine(0, pWidth);
      spokesArray.forEach((angle,j)=> {
        const realOrigin = (originsArray.length === 0) ? centre : originsArray[j].add(centre);
        Array.from(textLine).forEach((char,i)=>{
          if (char !== " ") {
            switch (keepShape) {
              case true:
                const point = line.getPoint(i / (count - 1)).rotate(angle).add(realOrigin);
                pointsArray.push(point);
                anglesArray.push(angle);
                speeds.push(bulletSpeed);
                break;
              default:
                anglesArray.push(angle + pAngleRange * (0.5 - i / (count - 1)));
                speeds.push(bulletSpeed);
            }
          }
        })
      })
      speedArray.push(speeds);
      break;
    case "OVERTAKE":
      speedArray.push(new Array(anglesArray.length).fill(bulletSpeed + (shotsCount - counter) * shotAcceleration));
      break;
    case "SPREAD":
      speedArray.push(...new Array(spreadCount).fill(bulletSpeed).map((item,i) => new Array(anglesArray.length).fill(item+shotAcceleration*i)))
      break;
    default:
      // "NORMAL"
      speedArray.push(new Array(anglesArray.length).fill(bulletSpeed));
  }
} // end of setUpCannons
The basic algorithm for generating the pictures has not changed, except that:
the pictures are generated off the cannon "spokes" generated by the getCannonSpokes function, and
I have used more higher order array related functions.
Intricacies of Javascript arrays
I am using my new found skills in using higher order array functions. Previously the code to add the "centre" positon to the cannonOrigins would have been as follows.
      for (let i = 0; i < originsArray.length; i++) {
        pointsArray.push(originsArray[i].add(centre))
      }
I now write it as follows:
pointsArray.push(...originsArray.reduce((acc,p)=>[...acc, p.add(centre)],[]))I still have not quite grasped the intricacies of assigning values to arrays within functions. So the above line coded as either of the 2 ways below, does not work.
pointsArray = [...originsArray.reduce((acc,p)=>[...acc, p.add(centre)],[])]
pointsArray = originsArray.reduce((acc,p)=>[...acc, p.add(centre)],[])
The above code would essentially now achieve the main objective of this post - which is to fire off pictures from not only nway, but also multi-nways, as well as parallel and other danmaku patterns.
However, I have made one more important change.
Holding picture data in external JSON file
Wrapping the picture data in one JS object
In the previous version of the code, I used to defined each text string data for each picture as a constant variable. I now define ALL the picture data as an object, with each picture having its own key so that it can be accessed easily. I have created a few more pictures in addition to the ones I created a while back - an extract of the data is shown below. Incidentally, I used this online tool to check the validity of the JSON file
{
    "description": "pixel data for danmaku PAINT",
    "gallery": {
      "plus": {
        "offset": 0,
        "pixels": [
          "   *   ",
          "   *   ",
          "   *   ",
          "*******",
          "   *   ",
          "   *   ",
          "   *   "
        ]
      },
      "multiply": {
        "offset": 0,
        "pixels": [
          "*     *",
          " *   * ",
          "  * *  ",
          "   *   ",
          "  * *  ",
          " *   * ",
          "*     *"
        ]
      },
      "rocket": {
        "offset": 0,
        "pixels": [
          "* *     * *",
          " * *   * * ",
          "  * * * *  ",
          "   * * *   ",
          "    * *    ",
          "     *     "
        ]
      },
Accessing the data from an external JSON file
Having created the data as the above, I can now save it externally as a JSON file. Phaser 3 has easy to use functions to load JSON files.
In the preload function, the following line loads the JSON file.
this.load.json('gallery', 'JSONfiles/gallery.json');Then it needs to be parsed to make sense. We stick it into a variable called gallery.
const gallery = this.cache.json.get('gallery');Then the relevant array containing the text string array can be accessed as follows.
const plus = gallery.gallery["plus"].pixels;
  const multiply = gallery.gallery["multiply"].pixels;
  const rocket = gallery.gallery["rocket"].pixels;
  const arrow = gallery.gallery["arrow"].pixels;
  const diamond = gallery.gallery["diamond"].pixels;
  const star = gallery.gallery["star"].pixels;
  const bullet = gallery.gallery["bullet"].pixels;
You can of shoot pictures from a standard nway, like the 3-way example below.

And with the new code, you can shoot pictures from multiple-nways, like the 4 x 2-way example below.

And of course, with the new code I can now shoot pictures from PARALLEL cannons, as posed at the top of the previous post. The parameter set for that is as follows.
  danmakuPattern.push({
    name: "PAINT-STAR",
    danmakuConfig: {
      type: "PARALLEL",
      countB: 2,
      vOffset: -220,
      width: 270,
      angle: 90,
      keepShape: true,
      picture: gallery.gallery["star"].pixels
    },
    cannonConfig: {
      class: "PAINT",
      stopShotsTime: 5000,
      fireRate: 300,
      pAngleRange: 25,
      width: 200,
    },
    bulletConfig: {
      class: "NORMAL" ,
      speed: 100,
      angularVelocity: 180,
      texture: "starMID", frame: 0
    },
  });
Reminders to my future self
Over the past few posts I have factored and consolidated a considerable amount of code. However, I have not touched the "DRAW" danmaku (which remains a danmaku type of its own). There is a lot of code in there that creates an single nway. This is something to be consolidated in the future.
And that's it! As always, here's the CodePen for your perusal and comment.


Comments