Danmaku using Phaser 3 (lesson 34): "DRAW" re-re-re-visited!
- cedarcantab
- Nov 4, 2021
- 4 min read
Updated: Nov 15, 2021
I can not seem to stop myself from fiddling with the DRAW danmaku code. I have pretty much re-written the core of the code, again. One of the limitations of the previous code was that you could not have a picture "snap" into existence then expand, although you could have pictures snap into existence then implode. It took a fair bit of extra code and a new variable to achieve this option. I could not stop at just such a small amendment. I added a new feature which allows the pictures to expand or shrink with bullets flying in different directions...it's impossible to explain. Best to explain the code, or better still to run the CodePen, accessible from link at bottom of this post!
Curves.Path objects are now created at "nominal" sizes
I have now recoded all the createXXX functions so that the Curves.Path objects are created with radius of 1 or width/height of 2 (i.e. from the centre of the object, the distance ends up being approximately 1), pretty much near it. This made the expanding and shrinking code result in more consistent results. Many of the objects were created by reference to a constant variable "nominalSize" set at 100, so it was quite easy simply to change that to 2.
So the code for creating an "arc" (or cllipse, or circle) in the lesson 31 version of the code was:
function createArc(aspectRatio, angleRange) {
  const startAngle = (angleRange === undefined) ? 0 : -90 - angleRange/2;
  const endAngle = (angleRange === undefined) ? 360 : -90 + angleRange/2;
  const nominalSize = 100;
  const radius = nominalSize / 2;
  const ellipse = new Phaser.Curves.Ellipse(0, 0, radius, radius * aspectRatio, startAngle, endAngle);
  return ellipse;
}
In the new version of the code, it is now:
function createArc(aspectRatio, angleRange) {
  const startAngle = (angleRange === undefined) ? 0 : -90 - angleRange/2;
  const endAngle = (angleRange === undefined) ? 360 : -90 + angleRange/2;
  const ellipse = new Phaser.Curves.Ellipse(0, 0, 1, aspectRatio, startAngle, endAngle);
  return ellipse;
}
But the real re-write was with the cannonsFromCurve function, which has turned into this:
function cannonsFromCurve({
  curve,
  width = 0,
  height = 0,
  heading,
  offset = 0, // this is optional distance to "shift" the shape from the centre of danmaku
  centre, // this is the origin of the danmaku
  numberOfPoints,
  speed,
  bearingOption = 1,
  keepShape = true,
  emerge = 1, // 1: explode, -1: implode
  open = false,
  multiple = 1,
  anglesArray,
  speedArray,
  cannonPositions,
})
{

  // start of main code
  const curveWidth = curve.getBounds().width;
  const curveHeight = curve.getBounds().height;

  heading += Math.PI/2;
  const xRadius = width/2;
  const yRadius = height/2;
  const aspectRatio = new Phaser.Math.Vector2(xRadius, yRadius);
  const speeds = [];
  const pointsArray = [];
  let angleT = 0;
  const angleDivision = (Math.PI * 2) / multiple;

  for (let j = 0; j < multiple; j++) {
    heading += angleDivision*j;
    angleT = 0;
    const cOffset = new Phaser.Math.Vector2(0,-offset).rotate(heading);
    for (let i = 0; i < numberOfPoints; i++) {
      let point = curve.getPoint(i / (numberOfPoints - 1 * open)).rotate(heading);
      if (keepShape && bearingOption !== 0) {
        switch (emerge) {
          case 1:
            anglesArray.push(Phaser.Math.Angle.BetweenPoints(Phaser.Math.Vector2.ZERO, point));
            break;
          default:
            anglesArray.push(Phaser.Math.Angle.BetweenPoints(point, Phaser.Math.Vector2.ZERO));
        }
        speeds.push(Phaser.Math.Distance.BetweenPoints(Phaser.Math.Vector2.ZERO, point) * speed);
      } else {
        anglesArray.push(heading - Math.PI/2 + angleT * bearingOption);
        speeds.push(speed);
      }
      const realPoint = point.multiply(aspectRatio).add(centre).add(cOffset);
      pointsArray.push(realPoint);
      angleT += Math.PI*2/numberOfPoints;
    }
  }
  speedArray.push(speeds);
  cannonPositions.push(...pointsArray);

} // end of create cannons from curve function
Two new parameters have been added:
keepShape (set by danmakuConfig.keepShape, which is assigned to this.danmakuKeepShape): this essentially tells the danmaku whether the picture should retain its shape as it expands or implodes, or flies across the screen.
danmakuConfig.option = bearingOption (set by danmakuConfig.option, which is assigned to this.danmakuOption): this is difficult to explain, but from a practical perspective, this should be set to zero if the picture is to snap into existence at a specified size, and fly across the screen "as is". Otherwise, it is used to as a "factor" to set the direction in which the individual bullets making up the picture flies off. If zero, the bullets all fly in the same direction (cannon angle) hence the pictures keeps its shepa. Otherwise, the bullets fly off in different directions and the picture "disintegrates" as it expands or implodes.
bearingOption parameter
Going back to the cannonsFromCurve function, the red highlighted lines represent the simple but highly dramatic code relating to bearingOption, which sets the angle of individual bullets forming the picture.
As explained above, this should be set to zero to make pictures fly across the screen. So the flying hearts example from lesson 31 requires the following parameter set; with the additional blue line.
  danmakuPattern.push({
    name: "FLYING HEART",
    danmakuConfig: {
      class: "DRAW", type: "HEART",
      width: 50, height: 50,
      count:30,angle:90,
      option: 0,
      angularVelocity: -150,
      switch: 0,
      flag: false
    },
    bulletType: {
      class: "NORMAL" ,
      speed: 200, fireRate: 300,
      texture: "cross", frame: 0
    },
  });
Otherwise, the direction of the bullet is set at angleT x bearingOption; i.e. the bullets forming the shape will fly off in different directions, when used in combination with emerge = 1 or emerge = -1, causing the shape to "twist" and disintegrate.
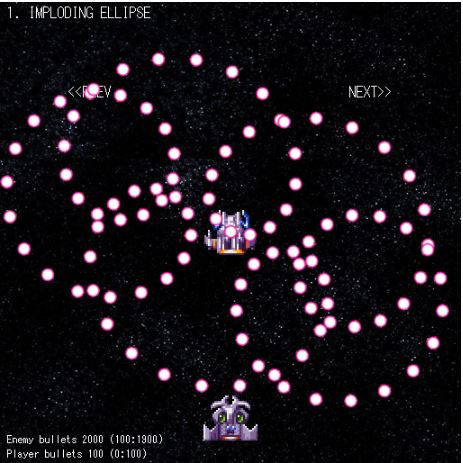
The danmaku at the top of the post was created with the following parameter set. Note I have used acceleration and maxspeed to make the picture more visible, before it starts crumbling.
   danmakuPattern.push({
    name: "IMPLODING ELLIPSE",
    danmakuConfig: {
      class: "DRAW", type: "ARC",
      ratio: 0.5,
      count: 100,
      width: 350, height: 350,
      angle: 90, angularVelocity: 5,
      option: 6,
      keepShape: false,
      switch: 1,
      flag: false // this is to inform that curve.path is a closed shape.
    },
    bulletType: {
      class: "NORMAL" ,
      speed: 0, acceleration: 10, maxSpeed: 200,fireRate: 5000,
      texture: "roundMID", frame: 4
    },
  });
To create a similar effect, you can combined this type of danmaku with Delay bullets (finally they come to demonstrate their usefulness on their own!).
 danmakuPattern.push({
    name: "COLLAPSING ELLIPSE",
    danmakuConfig: {
      class: "DRAW", type: "ARC",
      ratio: 0.5,
      count: 100,
      width: 350, height: 350,
      angle: 90, angularVelocity: 5,
      option: 5,
      keepShape: false,
      switch: 1,
      flag: false // this is to inform that curve.path is a closed shape.
    },
    bulletType: {
      class: "NORMAL" ,
      speed: 50, fireRate: 3000,
      texture: "roundMID", frame: 6
    },
     bulletTransform: {
      type: "DELAY",
      stage1Time: 1000,
      texture: "roundMID",
      frame: 0,
      lifeSpan: 15000,
    },
  });
And that is pretty much it, as far as the biggest change to the DRAW related code is concerned.
Some cleaning up of code
The switch statement which creates the curves.path object depending on the danmakuClass has now been spun off into a separate function. This in itself adds no additional functionality, but I intend to utilise this from the "EXPLODE" bullet function, at some later date.
Finally, here is the CodePen for your perusal and comment.


Comments