Danmaku using Phaser 3 (lesson 32): PARALLEL and PAINT revisited
- cedarcantab
- Nov 3, 2021
- 5 min read
Updated: Nov 5, 2021
I had created the Parallel danmaku in lesson 28. Then I tried to be clever and tried to factor the cannon related arrays setting with eh DRAW danmaku, by making the "line" of cannons as a curves.Line object - however that made the common function unnecessarily complicated. I have now separated the parallel danmaku as a separate class of its own rather than a "type" of DRAW danmaku "class" (like before I change it).
At the same time I have also made the following changes in the latest version of the code:
allow the cannons to be positioned "away" from the centre of the danmaku
used some of the code to allow the "PAINT" danmaku to paint the pictures fully formed
added some code so that if parallel stream of waving bullets are fired in parallel, each stream of bullets wave in opposite directions
The above are pretty marginal changes in functionality, but I have gotten round to changing variable names that's been bothering me for some time.
Changing names and structure of parameters
I have finally "wrapped" a lot of the cannon related variables into a new object variable called cannonConfig. It is debatable whether wrapping these variables into a separate object from danmakuConfig, but I find it easier to read the parameter set myself, at least for now. I have also added quite a few new variables.
this.cannonShotType = cannonConfig.class || "NORMAL"; // "OVERTAKE", "SPREAD"
    this.cannonShotSFX = cannonConfig.sound; // sound to be played for each shot
    this.numberOfShots = cannonConfig.numberOfShots || -1; // first check if it is defined. if not, set to default of -1
    this.numberOfShots = this.numberOfShots > 1 ? this.numberOfShots - 1 : this.numberOfShots; // otherwise reduce by 1 for repeatcount
    this.stopShotsTime = cannonConfig.stopShotsTime; // period to "stop", after shooting x this.numberOfShots
    this.cannonARandom = Phaser.Math.DegToRad(cannonConfig.randomAngle) || 0; // randomise bullet direction if status = true, by range
    this.cannonXRandom = cannonConfig.xRandom || 0;
    this.cannonYRandom = cannonConfig.yRandom || 0;
    this.cannonXOffset = cannonConfig.xOffset || 0;
    this.cannonYOffset = cannonConfig.yOffset || 0;
    this.cannonToggleOn = cannonConfig.toggleOn || false;
I have also changed the cannonTarget variable from a primitive type to a property of danmakuConfig object variable, and changed the internal name to this.danmakuTarget.
Parallel Danmaku Code
The code to create parallel firing cannons is not a straight copy of the one I created in lesson 28, but utilises the Curves.Line object as a "base" to place the cannons, as opposed to lerping from one end (created as a Vector) to the other end. I did not recreate the "random" option but instead added the option to be able to "offset" the line of cannons from the centre of the danmaku by a specified amount.
function parallelCannons({
width=100, heading, numberOfPoints, centre,
yOffset=0, xOffset=0,
speed, multiple=1,
anglesArray, speedArray, pointsArray
}) {
const line = createLine(width);
const angleDiv = Math.PI*2/multiple;
const speeds = [];
for (let j=0; j<multiple; j++) {
const angle = heading + angleDiv * j;
const shift = new Phaser.Math.Vector2(yOffset,xOffset).rotate(angle);
for (let i=0; i < numberOfPoints; i++) {
const point = line.getPoint(i / (numberOfPoints - 1)).rotate(angle).add(centre).add(shift);
pointsArray.push(point);
anglesArray.push(angle);
speeds.push(speed);
}
}
speedArray.push(speeds);
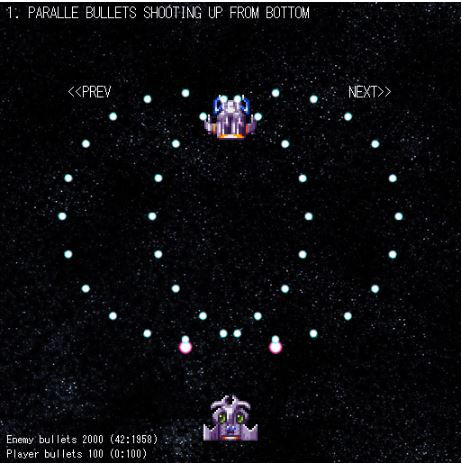
} // end of parallelCannons functionThe code is slightly longer than the original code because of the code to "shift" the position of the cannons "off centre", which allows danmaku like below.
By using this option, you can have bullets fire upwards from the bottom of the screen. If you can have bullets flying upwards, I thought it would be interesting to have the option to set gravity to the bullets.
By combining with explode bulletTransform, you can create a firework like danmaku.
danmakuPattern.push({
    name: "PARALLE BULLETS SHOOTING UP FROM BOTTOM",
    danmakuConfig: {
      class: "PARALLEL", count:2,
      width: 100,
      angle:-90
    },
   cannonConfig: {
     yOffset: -350,
     numberOfShots: 5,
     stopShotsTime: 1000,
    },
    bulletType: {
      class: "NORMAL",
      speed: 80, fireRate: 2500,
      texture: "roundMID", frame: 4
    },
    bulletTransform: {
      type: "EXPLODE",
      stage1Time: 3000,
      count: 20,
      speed: 200,
      texture: "roundSML",
      frame: 5
    }
  });
You will also notice that the "base" line is created by calling function "createLine", which takes 1 parameter (the length of the line in pixels) and returns a Curves.Line object.
function createLine(width) {
  const aa = new Phaser.Math.Vector2(0,width/2)
  const bb = new Phaser.Math.Vector2(0,-width/2)
  return new Phaser.Curves.Line(aa,bb);
}
This function is used by the new "PAINT" danmaku code.
Rewiring the "PAINT" danmaku code
I have substantially re-written the code. For one, it is a separate function as opposed to a method of the danmaku class. The only reason I have done this is that I find it easier to develop individual functions in a different environment as the danmaku object has become so big.
function cannonsFromString({
width,
centre,
bulletSpeed,
heading,
angleRange,
textLine,
keepShape = false,
anglesArray,
speedArray,
pointsArray
})
{
const speeds = [];
const count = textLine.length;
const line = createLine(width);
for (let i = 0; i < count; i++) {
if (textLine.charAt(i) !== " ") {
switch (keepShape) {
case true:
const point = line.getPoint(i / (count - 1)).rotate(heading).add(centre);
pointsArray.push(point);
anglesArray.push(heading);
speeds.push(bulletSpeed);
break;
default:
anglesArray.push(heading + angleRange * (0.5 - i / (count - 1)));
speeds.push(bulletSpeed);
}
}
}
speedArray.push(speeds);
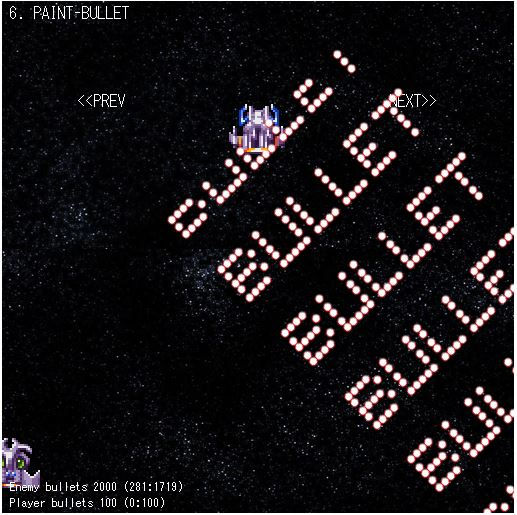
} // end of createFromString functionIf danmakuConfig.flag (passed to the above function as keepShape) is set to true, then "picture" comes out already formed, rather than expand from a point, like the example shown at the top of this post. Otherwise the parameters remain the same.
danmakuPattern.push({
    name: "PAINT-BULLET",
    danmakuConfig: {
      class: "PAINT",
      width: 250,
      count:10,
      angle: 45,
      flag: true,
      picture: bulletText
    },
    cannonAngleRange: { start: 90 }, // used to n-way type. angle range across which cannons are positioned.
    cannonConfig: {
      stopShotsTime: 500,
    },
    bulletType: {
      class: "NORMAL" ,
      speed: 100, fireRate: 100,
      texture: "roundSML"
    },
  });
Adding even more new variables
I have also added a new variable called this.cannonShotToggle, which is set to -1, when the danmaku.setProperties method is called. This variable toggles between 1 and -1 every time a bullet is fired.
I have also added a new cannonConfig.toggleOn, which is set to false by default.
cannonToggleOn (cannonConfig.toggleOn
created a new cariable called bulletSwtich - can be used for anything. default will be set to 1. If this is set to true, then the toggle value will be passed to the bullet object as (newly created) bulletSwitch variable. If the cannonShotToggleOn is false, then 1 is passed to the bulletSwitch variable.
for (let j = 0; j < this.cannonShotSpeeds[i].length; j++) {
        this.cannonShotToggle *= -1;
        const bulletSwitch = this.cannonToggleOn ? this.cannonShotToggle : 1;
For now, this bulletSwitch variable is only used in the below code.
// if WAVING type, then set up tween to adjust the bulletBearing
if (this.bulletType === "WAVING") {
this.swing = this.scene.tweens.addCounter({
from: -Math.PI / 2 * this.bulletSwitch,
to: Math.PI / 2 * this.bulletSwitch,
duration: this.bulletCycleLength,
repeat: -1,
yoyo: true
}); // end of tween set up
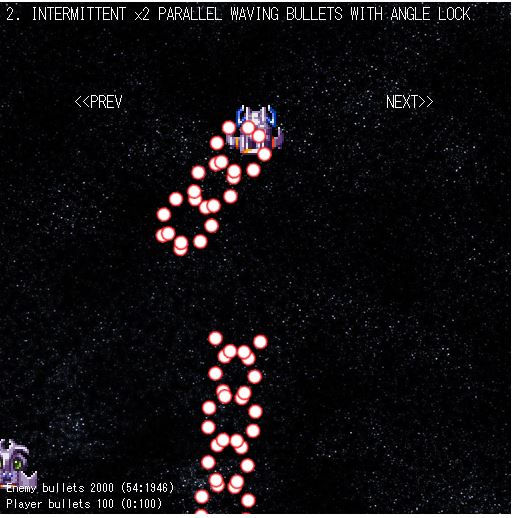
} // end of if statement to check for "WAVING"All it does is flip the sign of the from and to properties of the "swing" timer used for making the bullets "wave". Hence, if cannonToggleOn is true, respective bullets will "wave" in opposite directions. I did this to create effect like below, which is a 2x parallel cannons (firing from the same position) waving bullets. Yes, a lot of code and complexity for a simple effect - I must find other ways of using this bulletToggle variable.
And that's it for this post. There is the CodePen for your perusal and comment.


Comments