Danmaku using Phaser 3 (lesson 23): Exploding Bullets
- cedarcantab
- Oct 11, 2021
- 5 min read
Updated: Dec 6, 2021
Turnning our attention to the bullet object again, in this post we create functionality to make bullets explode!

The mechanics of an exploding bullet are as follows:
after a bullet is fired, keep moving the bullet until a predetermined time period
when the time arrives, fire predetermined number of bullets in all directions, from the position of the existing bullets
destroy the original bullet
We have already created code that achieves steps 1 and 3 above, with the bullets with a predetermined lifespan (lesson 16). Specifically, the the preUpdate function was used to count the time since firing the bullet, and when the time came, destroy the bullet. We will build upon this existing code to achieve the desired effect. In order to do so, we will change the bulletLife variable into an object called bulletTransform, which will contain the instructions on how the bullet should "transform"; so in the case of bullet with limited lifespan, that would be an instruction to kill off the bullet after a predetermined time, like below:
bulletTransform: {type: "OFF", stage1Time: 3000}bulletTransform.type determines the type of transformation the bullet should undergo. In the above, the instruction is to "OFF" the bullet after 3000ms (determined by bulletTransform.stage1Time) after the bullet is fired.
If nothing is passed, bulletTransform.type will be set to "NONE", which will be caught by the default switch/case statement which does nothing.
We will indicate an exploding bullet by setting bulletTransform.type. To create an explosion, we need a few more variables; the minimum being the number of fragments that the bullet splits into. In addition we will allow the bullet Texture, Frame and Speed to be set, like the example shown below.
bulletTransform: {
      type: "EXPLODE",
      stage1Time: 3000,
      splitInto: 8,
      speed: 200,
      texture: "knife",
      frame: 3
    }
The basic code to create the explosion is as follows. It is basically, calling the bullet.fire function from a for-loop, for the number of exploding fragments determined by bulletTransform.splitInto. The direction in which the fragments should fly off to are first calculated and pushed into an array, just the same as we calculate the angles for nway in the danmaku object. Then we cycle through that array calling the bullet.fire function.
  explode(scene) {

    const splitInto = this.bulletTransform.splitInto;
    const angleRange = this.bulletTransform.angleRange || 360
    const directions = []
    // calculate the angles of exploding fragments
    switch (angleRange) {
      case 360:
        for (let i = 0; i < splitInto; i++) {
          directions.push(this.angle + i * (360 / splitInto));
        }
        break;
      default:
        for (let i = 0; i < splitInto; i++) {
            directions.push(this.angle +(i / (splitInto - 1) - 0.5) * angleRange);
          } // end of for loop where cannon range is less than 360
        break;
    }

    for (let i = 0; i < splitInto; i++) {
      const direction = directions[i];
      const bullet = enemyBullets.getFirstDead(false);
      if (bullet) {
        this.bulletConfig.shootAngle = direction;
        this.bulletConfig.bulletAngle = direction;
        this.bulletConfig.bulletSpeed = this.bulletTransform.speed || this.bulletSpeed;
        this.bulletConfig.bulletTexture = this.bulletTransform.texture || this.bulletTexture;
        this.bulletConfig.bulletFrame = (this.bulletTransform.texture === undefined) ? this.bulletFrame : this.bulletTransform.frame; // if texture is not defined, use existing frame
        this.bulletConfig.bulletType = "NORMAL";

        bullet.fire(scene, this.bulletConfig); // end of bullet fire method
      } // end of if statement which checks whether bullet is null
    }
  } // end of explode method
This function is called from a switch statement within the preUpdate function.
switch (this.bulletTransform.type) {
      case "OFF":
        if (this.timeSinceFired > this.bulletTransform.stage1Time) {
          this.switchOff();
        }
        break;
      case "EXPLODE":
        if (this.timeSinceFired > this.bulletTransform.stage1Time) {
          this.bulletConfig = this.setBaseConfig();
          this.explode(this);
          this.switchOff();
        }
        break;
      default:
        break;
    }
I am actually storing the configuration for the bullet.fire function as in an object called this.bulletConfig first, by calling a function called setBaseConfig. Then the bullet.fire function is called via the explode function. This may seem a bit convoluted, but it is to allow flexibility when I create further bullet types (probably).
I have also created a new function switchOff() and this is called when the bullet is to be hidden, instead of calling the disableBody function directly.
switchOff() {
    if (this.swing) {
      this.swing.remove();
    }
    this.disableBody(true, true);
  }
And that is pretty much all the code directly relevant to the exploding bullet.
Danmaku life bullet images
In this post, I have finally got around to doing what I have been meaning to do for a long time - that is to use images for the bullets are more "danmaku" like.
There are plenty of danmaku and bullet hell like spritesheets available for free. For example, this site makes available a lot of assets that you can freely use.
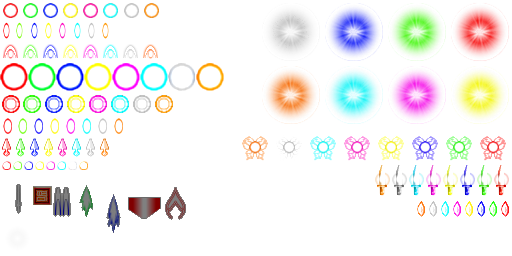
I have used the below sprite sheet available from the site.

In order to make it easier for Phaser 3 framework to handle, I have cut out the relevant images, rotated them where appropriate (using Windows standard 3D paint application) and repacked each bullet type as individual spritesheets (using the free version of TexturePacker GUI).
I have not cut out every bullet type available, but have created the following (key name used in the code, together with the file name and the individual frame sizes are shown).
daggerMID: DaggerMedium.png (19x9)
eyeball: Eyeball.png (18x18)
knife: Knife.png ( 31x15)
oblongMID: OblongMedium.png ( 16x9)
oblongSML: OblongSmall.png ( 9x5)
roundBIG: RoundBig ( 28x28)
roundMID: RoundMedium.png ( 15x15)
roundSML: RoundSmall.png ( 9x9)
skinny: SkinnyMedium.png ( 17x7)
supersonic: SuperSonic.png ( 15x15)
teardrop: TeardropMedium.png ( 16x8)
Each sprite sheet has 8 frames, each representing a different colored version.
I am loading these files from my own Github page.
Examples
Big Green Balls exploding into knives
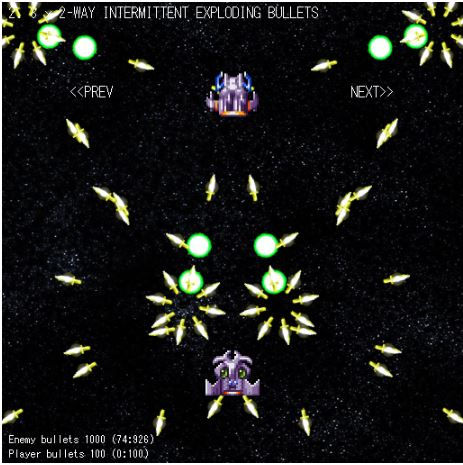
The danmaku pictured at the top of this page is created with the following parameters.
danmakuPattern.push({
    name: "3 x 2-WAY INTERMITTENT EXPLODING BULLETS",
    danmakuType: "MULTI_NWAY",
    numberOfCannons: 2, // number of (pair in case of bi-directional danmaku) cannons
    cannonAngle: 90, // direction in which the primary cannon faces.
    //    cannonAngularVelocity: 30,
    cannonAngleRange: 25, // used to n-way type. angle range across which cannons are positioned.
    numberOfNWAY: 3,
    numberOfShots: 3, // how many times to shoot the weapon in succession
    stopShotsTime: 3000,
    // properties for individual bullets
    bulletType: "NORMAL",
    bulletSpeed: 80, // speed of bullets fired from cannon

    timeBetweenShots: 500, // time between bullets in ms
    bulletTexture: "roundBIG", // specify the bullet image to be used,
    bulletFrame: 1,
    bulletTransform: {
      type: "EXPLODE",
      stage1Time: 3000,
      splitInto: 8,
      speed: 200,
      texture: "knife",
      frame: 3
    }
  });
Sidewinder
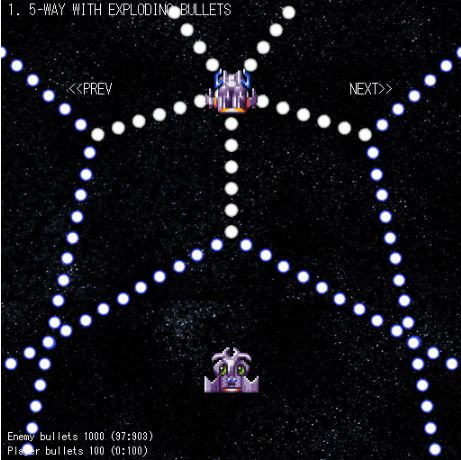
By using the angleRange sub-parameter of the bulletTransform parameter, you can create "winder" type of danmaku, as below.

Spiraling exploding bullets
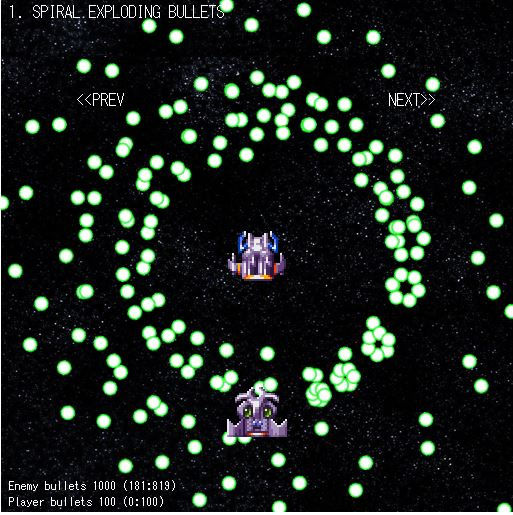
Artistic creativity is not my strong point but by introducing timing differences into the explosions, the patterns become much more interesting, like the parameter set below (unfortunately the you cannot appreciate the "beauty" from the still picture).
 danmakuPattern.push({
    name: "SPIRAL EXPLODING BULLETS",
    danmakuType: "NWAY",
    numberOfCannons: 1,
    cannonAngle: 90, // direction in which the primary cannon faces
    cannonAngularVelocity: 360,
    numberOfShots: 20, // how many times to shoot the weapon in succession
    stopShotsTime: 4000,
    // properties for individual bullets
    bulletType: "NORMAL",
    bulletSpeed: 100, // speed of bullets fired from cannon
    timeBetweenShots: 50, // time between bullets in ms
    bulletTexture: "roundMID", // specify the bullet image to be used,
    bulletFrame: 1,
    bulletTransform: {
      type: "EXPLODE",
      stage1Time: 1500,
      splitInto: 6,
      speed: 50,
    }
  });

Other changes
One cosmetic, but very significant change I have made in this version of the code is that have switched off pixelArt. This has resulted in an enormous improvement in how the flying bullets look on screen.
And that's pretty much it. Here is the CodePen for your perusal and comment.


Comments