Danmaku Interlude Part 5: Adding collision detection
- cedarcantab
- Sep 9, 2021
- 5 min read
In the previous post we added code so that when the player fired bullets, a "shooting" sound is played. However, the bullets fired by the player went straight through the enemy, and bullets fired by the danmaku enemy went straight through the player.
In this post, we add code to make things happen when player bullets hit the enemy and when enemy bullets hit the player. The key concept is "collision detection" or detecting when 2 objects collide with each other. Phaser framework makes this straight forward.
Before get coding..
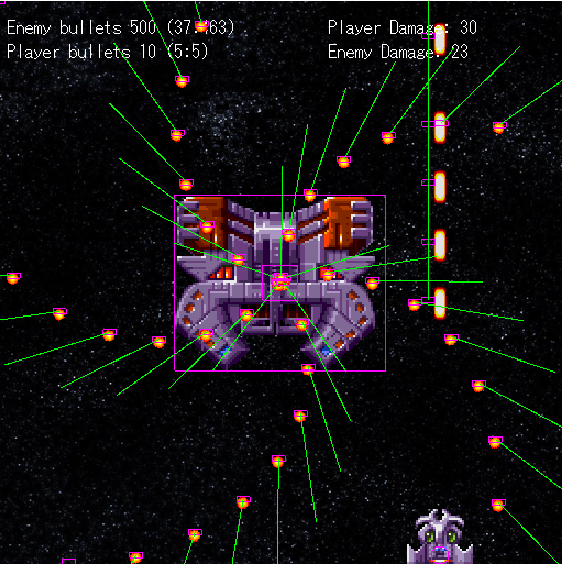
First, let's turn the debug option of the game configuration to true, with the following. This will allow us to "see" the physics bodies, and the velocity vectors of the game objects.
const config = {
  width: 512,
  height: 512,
  backgroundColor: 0x000000,
  pixelArt: true,
  physics: {
    default: "arcade",
    arcade: {
      debug: true
    }
  },
And we can set some parameters to the enemy and player characters to count how many times they have been hit respectively.
For the enemy, the following line in the create function.
enemy.damage = 0;And for the player, the following line in the player class constructor function.
this.damage = 0;Then create the text to display the damage data, by inserting the following lines in the create function
// create text objects to display the player and enemy properties
  playerDamageText = this.add.text(300, 16, "", { font: "16px monospace" });
  enemyDamageText = this.add.text(300, 38, "", { font: "16px monospace" });
Now we are ready to write the important collision detection code.
Checking for 'overlap' between the enemy and the player bullets
We can get the Phaser's physics engine to check for overlap between two game objects, by using:
overlap(object1 [, object2] [, collideCallback] [, processCallback] [, callbackContext])Basically the above code calls the collideCallback function when there is an overap between the two game objects: object1, and object2.
Specifically, by inserting the following code into the create function, whenever the playerBullets (this is a group) overlaps with the enemy (which is a arcade.sprite object), then the code in the curly brackets gets executed. The key piece of code is the disableBody(true, true). The first parameter, if true, deactivates this game object, and the second parameter if true hides the game object.
this.physics.add.overlap(enemy, playerBullets, function (_enemy, _bullet) {
    explodeSound.play();
    _enemy.damage += 1;
    enemyDamageText.setText('Enemy Damage: ' + enemy.damage); // update enemy damage property on screen
    _bullet.disableBody(true, true);
  });
In the parameters passed to the callBack function, I have deliberately used names that are not the same as name of the game objects being tested.
How does Phaser know which is which? Apparently, it is the it is always the single sprite object, as opposed to the group (when a single object is being tested against a group of objects) it is the single object that is passed as the first parameter of the callBack function. The order in which the 2 objects being tested appears does not seem to matter. In other words, even if you substitute the first line with below, the result is exactly the same.
this.physics.add.overlap(playerBullets, enemy, function (_enemy,  _bullet) {
});
In a similar fashion we can create a collider function between the enemy bullets and the player.
this.physics.add.overlap(player, enemyBullets, function (_player, _bullet) {
    explodeSound.play();
    _player.damage += 1;
    playerDamageText.setText('Player Damage: ' + player.damage); // update player damage property on screen
    _bullet.disableBody(true, true);
  }); // end of overlap callback function between player and enemyBullets group
The sprite image and the physics body
In the code above, Phaser's physics engine is checking collisions on the Body of the sprite. This is not strictly the same as the sprite image, although in practice they act together. This means that the we can change the size of the physics body independently of the sprite image that is displayed. By doing so, we we can change the 'hitbox' of the sprite. In real danmaku type of games, the hitbox of the player is usually a lot smaller than the actual image displayed, allowing the player to dodge and weave out of seemingly impossible situations.
As you might have noticed the player is very large in this demo. The original image used is 60 pixels in width and 50 pixels in height. By default, when the sprite is created, the physics body will take on the same size.

We can reduce the size of the physics body by using setSize method. According to the Phaser documentation, setSize(width, height) sets the internal size of the game object, as used for frame or physics body creation. This is not the same as the size that the object is drawn on screen (which is altered using the setScale method).
So the following code will change the hitbox size to 16x16.
// change the hitbox size
this.setSize(16, 16)
We can also change the 'position' of the physics body relative to the sprite image using setOffset(x [, y]). This is relative to the top right hand corner of the parent game object, and the hitbox is placed at (x,y) with respect to its top right hand corner, like so:
// change the hitbox size
this.setSize(16, 16).setOffset(30-8,50-16)
Phaser 3 also allows you to change the hitbox to a circle, as opposed to a square, using setCircle(radius [, offsetX] [, offsetY]), like so.
this.setCircle(8, 30-8, 50-16)
It is difficult to see, but the hitbox has changed to a circle. This might "take the edge off" collision detection (!).
Not possible to rotate body with Arcade.Physics engine
Finally, a word about one of the peculiarities of the physics body, using Arcade.Physics engine. The physics body does not rotate even when the sprite image is rotated.
In our bullet fire method, we set the shootAngle property, along which we rotate the sprite so that it looks like the bullet is 'facing' the direction of its travel. All this makes no difference when the sprite is a square or a circle. However, strange things happen when the sprite is elongated, like the player bullet we are using "bullet6", which is a 32x12 image. The bullet image works fine when it is being fired at an angle of zero (ie right).

However, in our example, as the bullet is fired upwards, the image is being rotated by -90 degrees. The physics body cannot be rotated, so the sprite image and the physics body becomes out of sync, as shown below.

If you feel strongly about this, you could recreate the image to be square and reduce the hit box area to a box that is in the middle of the image. Or, you can use a more sophisticated physics engine like Matter which is also provided for by the Phaser framework.
I have changed the bullet image of the enemy to "bullet7" which is a circle.
Finally, I have changed the sound associated with the player firing bullets to "blaster.mp3" as the sound was too similar to "explode1.wav".
Now, if you run the code, you should see the enemy damage counter increment when you hit fire bullets at the enemy (not difficult), and the player damage increase when the player is hit by an enemy bullet.
Of course, this is nothing like a proper game with good game play. However, we have now incorporated much of the basic mechanics of what's required to build game.
The full CodePen Pen is available below, for your perusal.


Comments