2D Raycasting using Phaser 3, Part 3
- cedarcantab
- Mar 12, 2022
- 3 min read
The previous two posts explored how 2D ray casting can be achieved using the various built-in methods of Phaser 3 framework. They all utilised some kind of geometry mathematics and the various Phaser 3 Geom class methods.
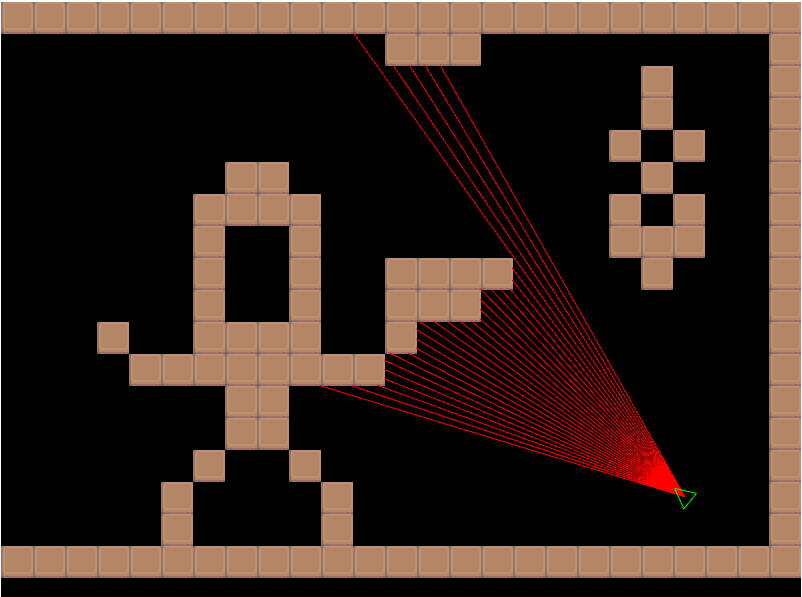
With tilemaps however, there is a popular method based on Digital Differential Analysis (DDA) algorithm. This post is about my implementation of this method.
This alogirhm is famous for having been used in many classic games, most notably Wolfenstein 3D, as described in this very interesting site here. I will not repeat the details of the algorithm here, except to say that I finally understood the algorithm by conceptualising it as "jumping" in "big steps" from the origin in the given angle, until you bump into a tile. There are different ways of "jumping" in a given direction. In fact, drawing a straight line is dependent on such an algorithm (except rather than jumping in big steps, you jump pixel by pixel) and the standard algorithm used for drawing lines is called the Bresenhams line algorithm, and indeed Phaser provides a method to carry.
Phaser.Geom.Line.BresenhamPoints
According to the documentation, this method returns an array of all coordinates on the line given. Looking at this example here, it looks as if this might achieve what we need for 2D raycasting.
For the purposes of ray casting however, it appears that DDA is more appropriate, despite its relative inefficiency because the Bresenham approach can make diagonal jumps (as opposed to DDA which zig zags) and hence miss tiles that the line actually pass over. For example, in moving from (0,0) to (1,1) the Bresenham algorithm will jump directly, whereas DDA will jump via (1,0) or (0,1). This is exactly what we need to make sure we capture all tiles along the ray's direction.
Digital Differential Analysis
There are various Youtube videos which explain how to implement this algorithm, and the ones I referenced are listed at the bottom of this post. As you'd expect there are various different ways to implement this algorithm, but I personally found the way the algorithm coded in the below video (in C++ I think), most easy to understand.
And it is based on this implementation, I have implemented my own version in Javascript. I have included below my "interim" experiement that was used to test that the code works. If you are interested in making it more efficient, you might like to take my code apart.

RayCaster class based on DDA
The code I included in the final example (available in Codepen at the end of this post) takes angle as its sole parameter, but assumes that the "origin" from which to cast the ray is already set in this.x, and this.y. The method returns the collision point and the distance to the collision point in a Phaser.Math.Vector3, like the other Phaser 3 intersection type methods.
  dda(angle) {
    this.x2 = this.x + Math.cos(angle);
    this.y2 = this.y + Math.sin(angle);
    const tan = Math.tan(angle);
    let rx, ry, xo, yo, vx, vy;
    let disV = Number.MAX_VALUE;
    let disH = Number.MAX_VALUE;
    let dof = 0;

    // check horizontally, intersection against vertical, ie left or right of the tile
    if (this.y === this.y2) {
      rx = this.x;
      ry = this.y;
      dof = Number.MAX_VALUE;
    } else {
       if (this.x2 > this.x) { // looking right
         rx = Phaser.Math.Snap.Ceil(this.x, this.map.tileWidth)
         ry = this.y + (rx - this.x) * tan;
         yo = this.map.tileWidth * tan;
         xo = this.map.tileWidth;
       } else {
         rx = Phaser.Math.Snap.Floor(this.x, this.map.tileWidth)-1;
         ry = this.y + (rx - this.x) * tan;
         yo = -this.map.tileWidth * tan;
         xo = -this.map.tileWidth;
       }
    }

    while (dof < this.map.width) {
      if (this.map.hasTileAtWorldXY(rx, ry)) {
        disV = Phaser.Math.Distance.Between(this.x, this.y, rx, ry);
        break;
      } else {
        dof++;
        ry += yo;
        rx += xo;
      }
    }
    vx=rx; vy = ry;

    // check vertically, intersection against horizontal, ie bottom or top of the tile
    if (this.x === this.x2) {
      rx = this.x;
      ry = this.y;
      dof = Number.MAX_VALUE;
    } else {
       if (this.y2>this.y) { // if looking downwards
         ry = Phaser.Math.Snap.Ceil(this.y, this.map.tileHeight);
         rx = this.x + (ry - this.y) / tan;
         xo = this.map.tileHeight / tan;
         yo = this.map.tileHeight;
       } else {
         ry = Phaser.Math.Snap.Floor(this.y, this.map.tileHeight)-1;
         rx = this.x + (ry - this.y) / tan;
         xo = -this.map.tileHeight / tan;
         yo = -this.map.tileHeight;
       }
      dof = 0;
    }

    while (dof < this.map.height) {
      if (this.map.hasTileAtWorldXY(rx, ry)) {
        disH = Phaser.Math.Distance.Between(this.x, this.y, rx, ry);
        break;
      } else {
        dof++;
        rx +=xo;
        ry += yo;
      }
    }
    if (disV < disH) {
      rx=vx; ry=vy; disH=disV;
    }
    return new Phaser.Math.Vector3(rx, ry, disH)
  }
And having coded the DDA algorithm, it is easy to implement the various raycasting methods created in the previuos psots.
Here is the CODEPEN for your perusal and comment.
Useful references

Comments